BigCommerce
1. Introduction
The DNA Payments Processing Gateway Plugin for BigCommerce helps BigCommerce store owners and merchants to Secure DNA Payments Processing Gateway when customers opt to pay for their order using DNA Payments.
The aim of this document is to explain the procedure of installation and configuration of the plugin on your website. Please be very careful and pay close attention to ALL details in this document as if any one of them is misconfigured, it may cause issues.
2. Requirements
In order to use the DNA Payments Processing BigCommerce plugin, please ensure that you meet the following requirements:
You must have an active and fully approved DNA Payments Processing Account with DNA Payments Processing. If you do not have a merchant account yet, feel free to contact our Customer Support at support@dnapaymentsgroup.com. If your account is still pending approval, you will need to wait before installing.
Please ensure that you have the credentials detailed below:
Client ID- ID issues by DNA Payments for each live merchant.Client Secret- Secret issued by DNA Payments for each live merchant.Terminal- Live terminal number issued by DNA Payments - unique to each merchant site.
Should any of the above details be missing please contact DNA Payments.
3. Installation
Once you have met all the above requirements and you have your API credentials, you’re ready to install. Please follow all the steps below and you will be taking payments in no time.
Step 1: Login to your BigCommerce Store
Login to the administrative portion of your BigCommerce Store by visiting BigCommerce’s website or your store’s administrative panel. If you are unsure how to do this, please consult BigCommerce’s instructions, FAQ, or Support Helpdesk.
Step 2: Install the DNA Payments App
- Click Apps
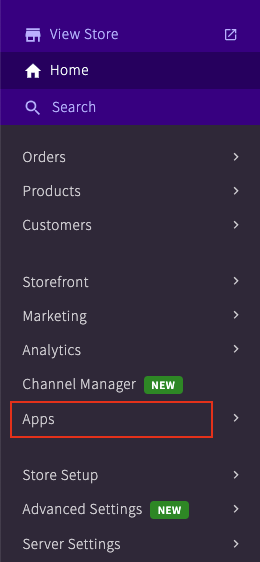
- Click Marketplace

- Search or browse to locate DNA Payments, and click the DNA Payments logo.

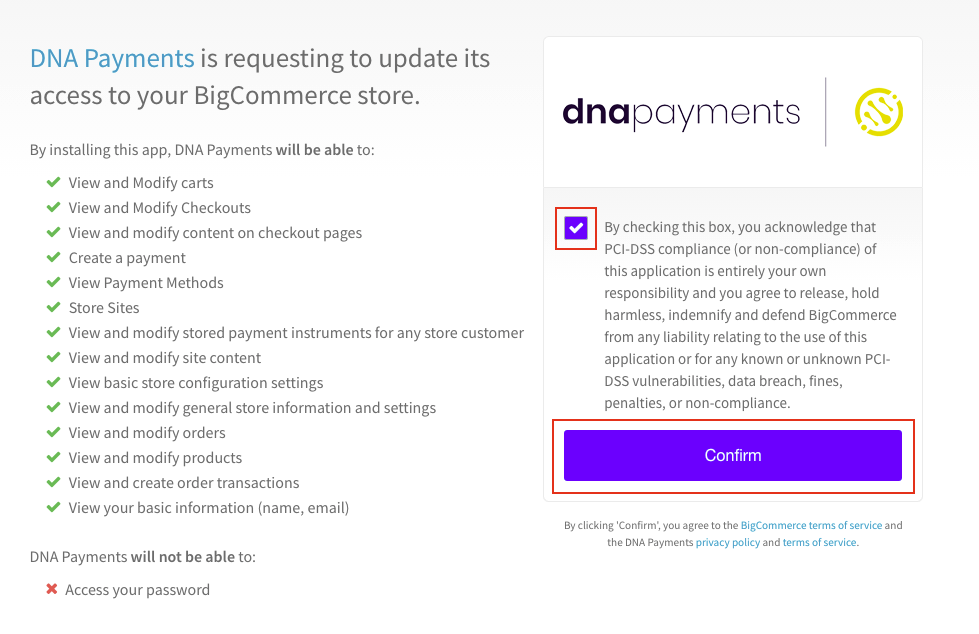
- Agree to the BigCommerce terms and click Confirm.
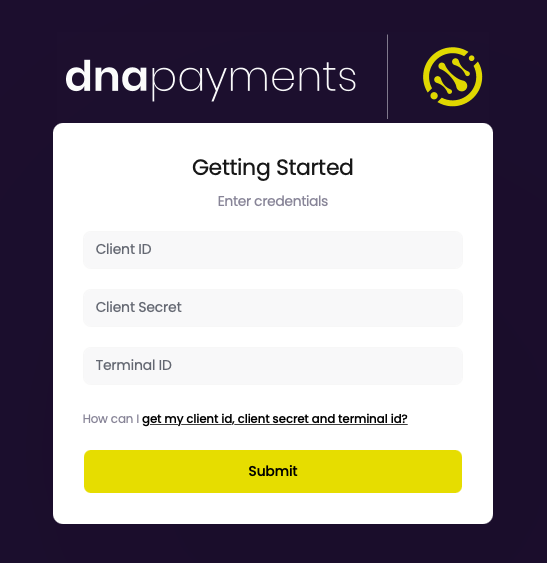
- Input your DNA Payments credentials, and click Submit. The credentials must be valid. Otherwise, you will not be able to log in.
Step 3: Configure the DNA Payments App
After installing the app, you will see the Dashboard page where you can configure your payment method and view order details.
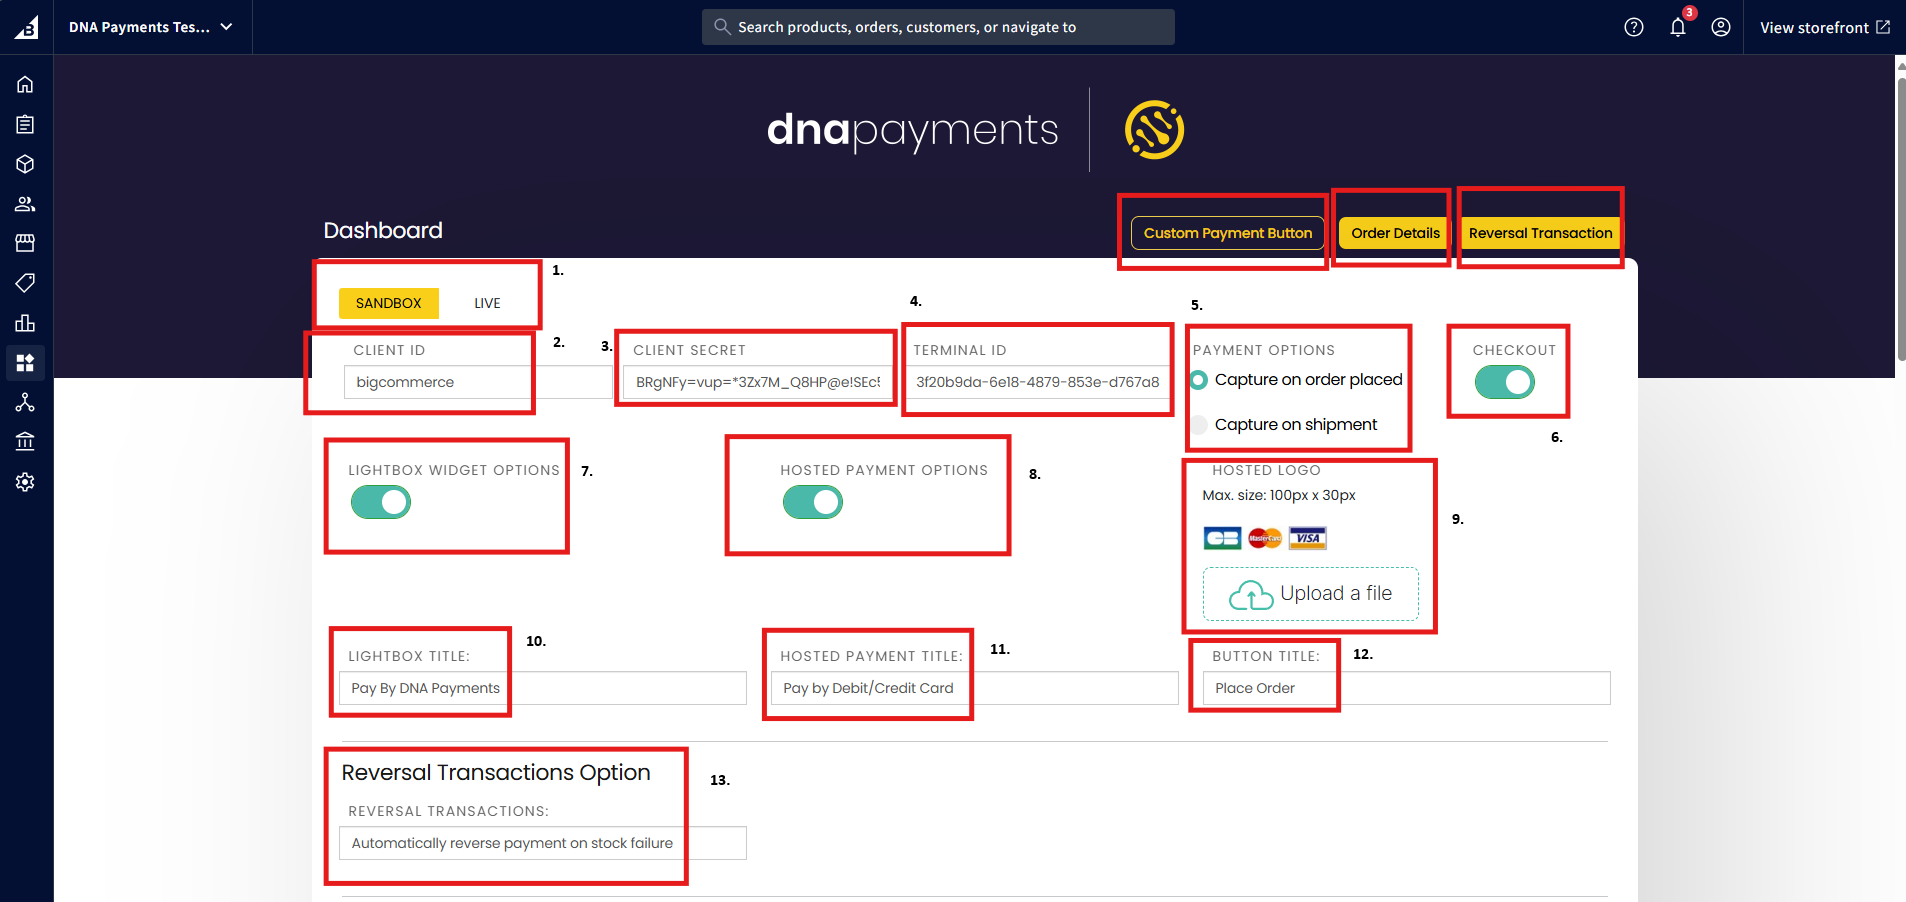
Allows you to amend the environment between the Sandbox(test) environment and the Live(Production) environment.
Displays your Client ID. By clicking on it, you can edit Client ID.
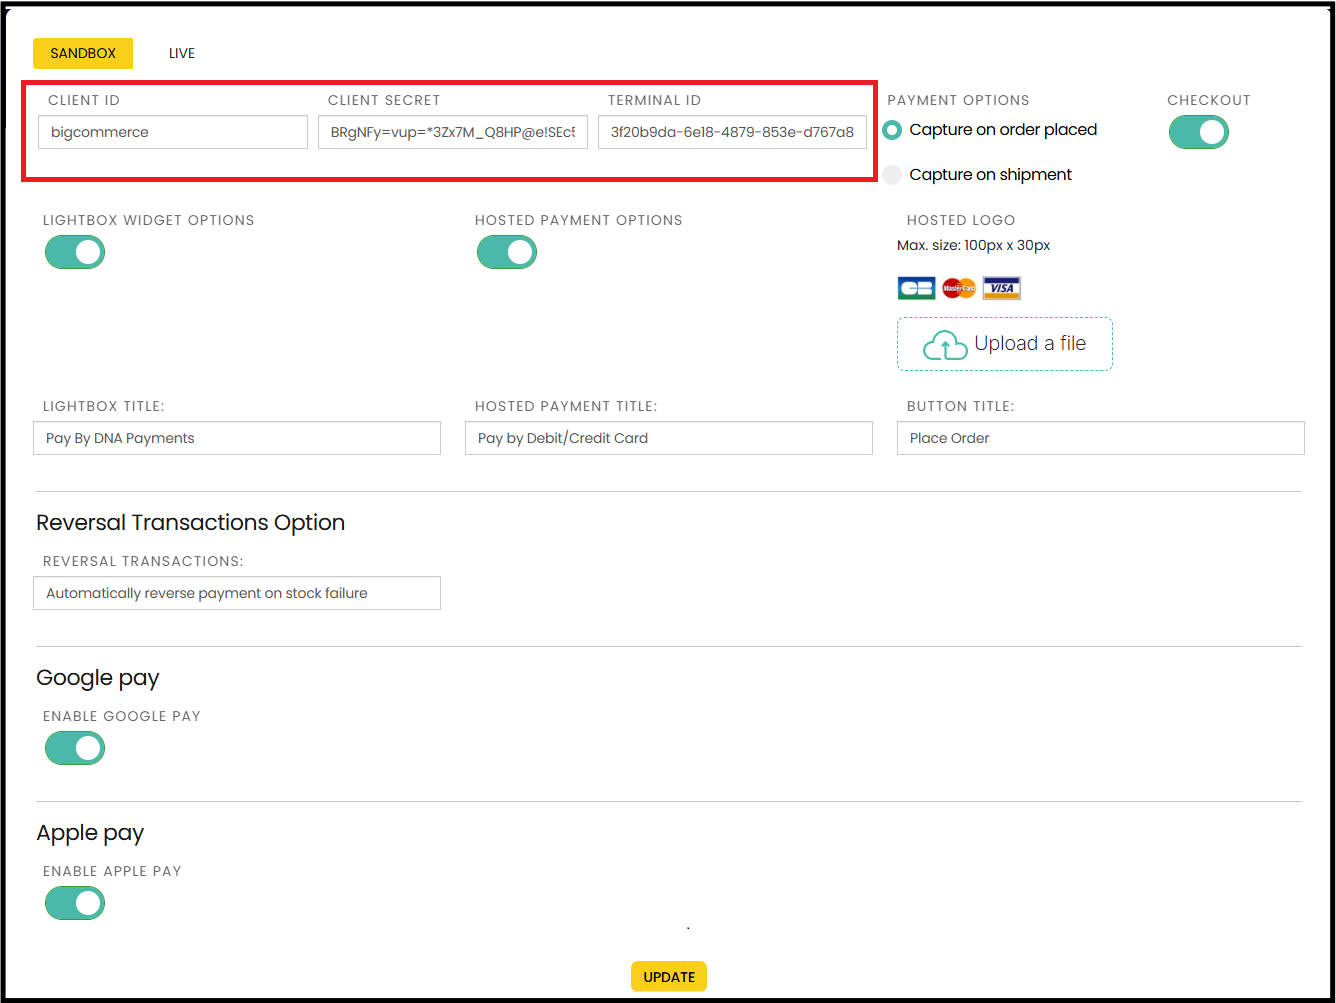
Displays your Client Secret. By clicking on it, you can edit Client Secret. See above, point 2 for image.
Displays your Terminal ID. By clicking on it, you can edit Terminal ID. See above, point 2 for image.
In the Payment Options block, you can change Transaction type.
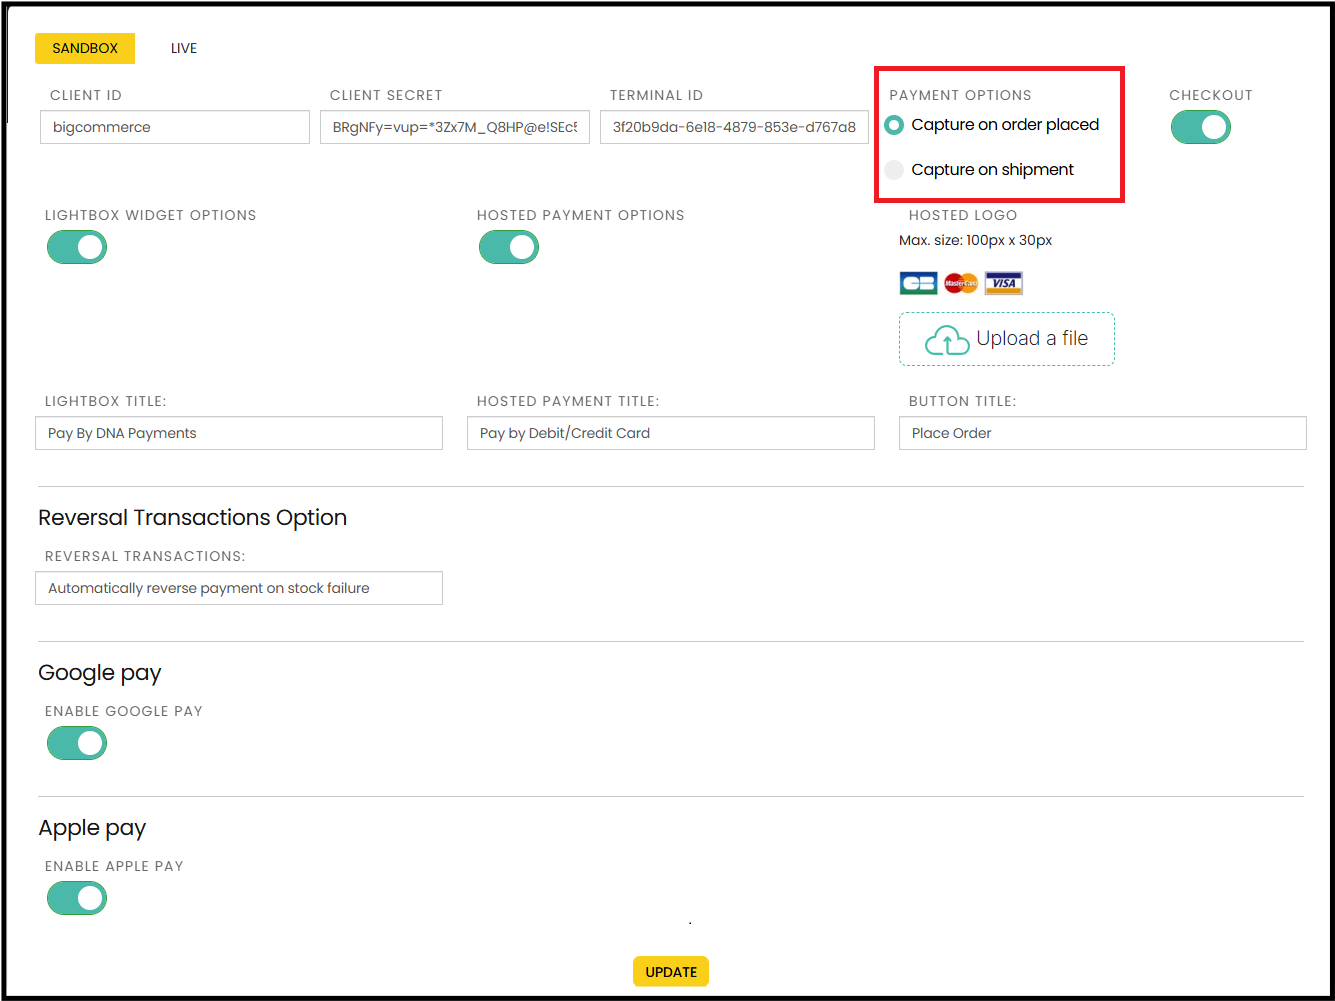
Capture on order placed- A transaction is settled automatically after the successful payment.Capture on shipment- A transaction is settled after you click the Settle button in the Action column in the Order Details table, or when you change the BigCommerce order status to Shipped.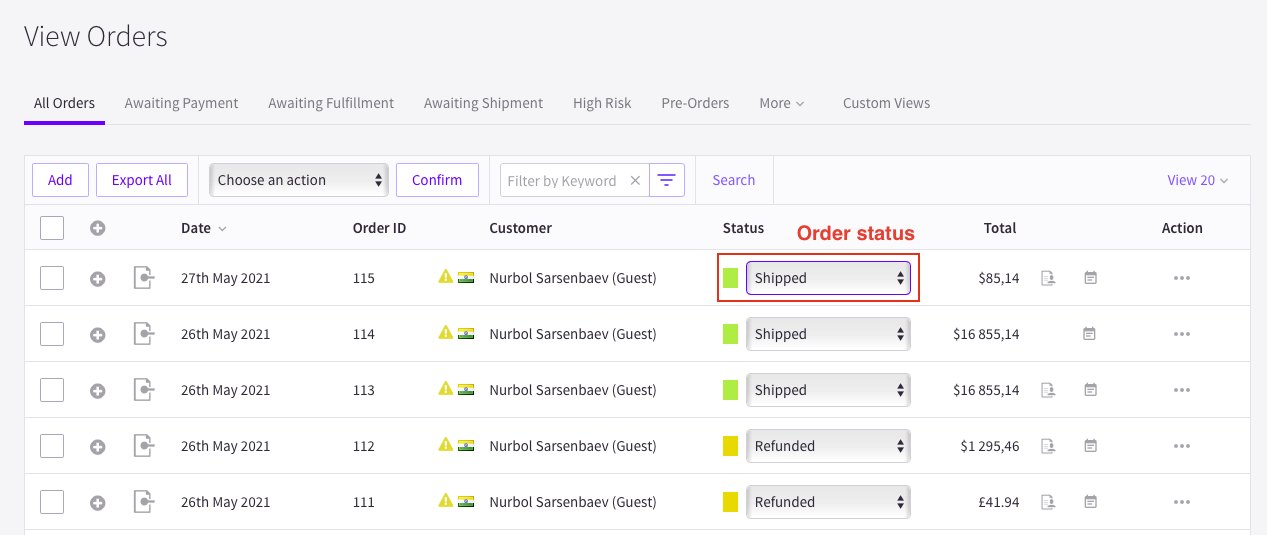
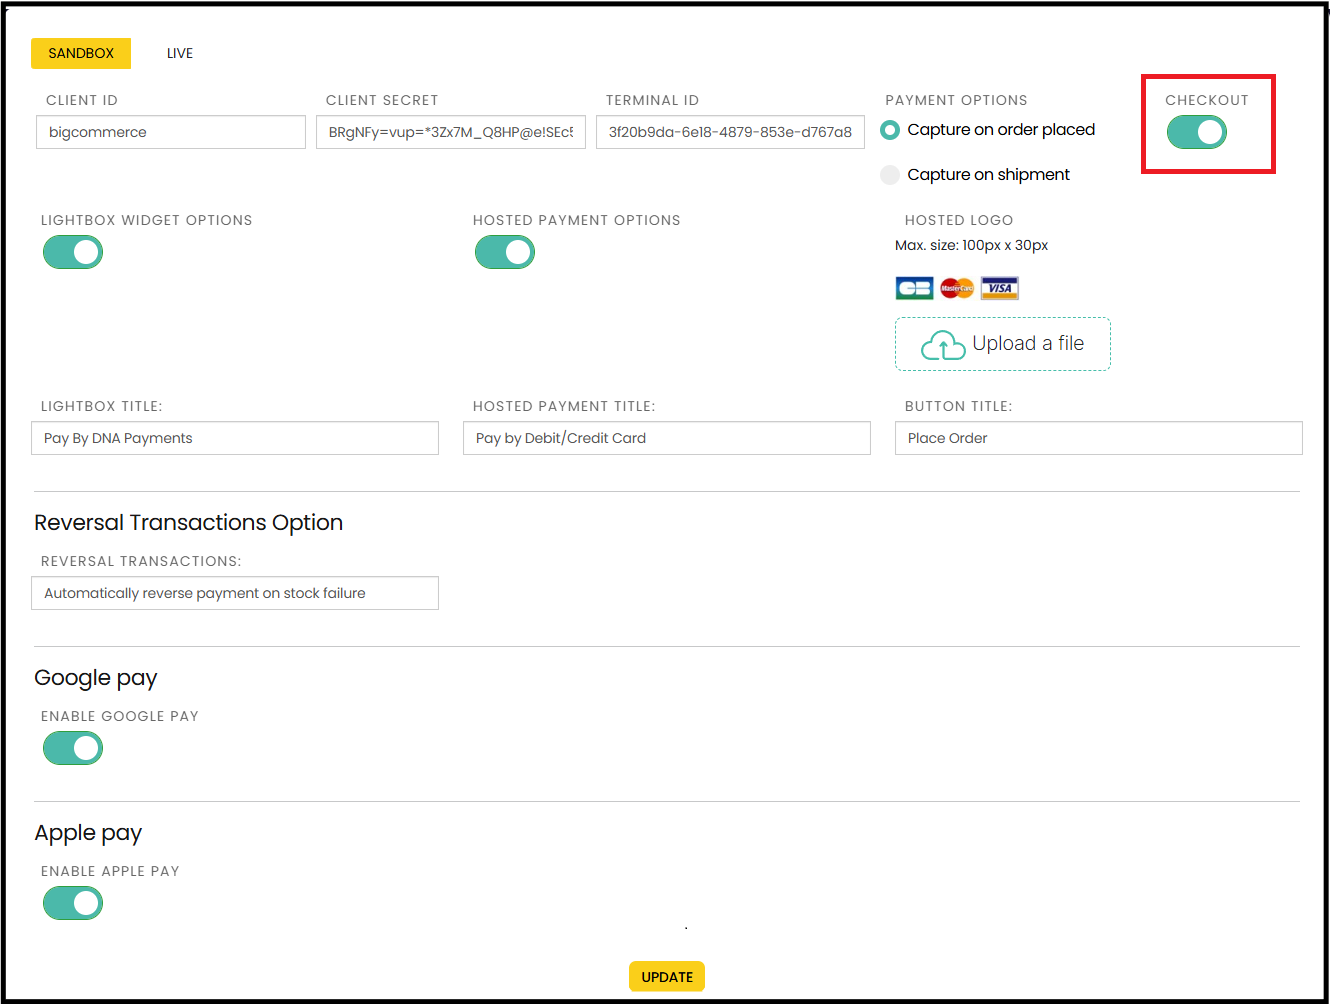
By switching the Checkout toggle you can show/hide the checkout.
The 'Lightbox widget options' toggle allows you to enable and disable the Lightbox checkout option. Please note we advise selecting either 'Lightbox' or 'Hosted Payment' option to avoid any confusion at checkout.
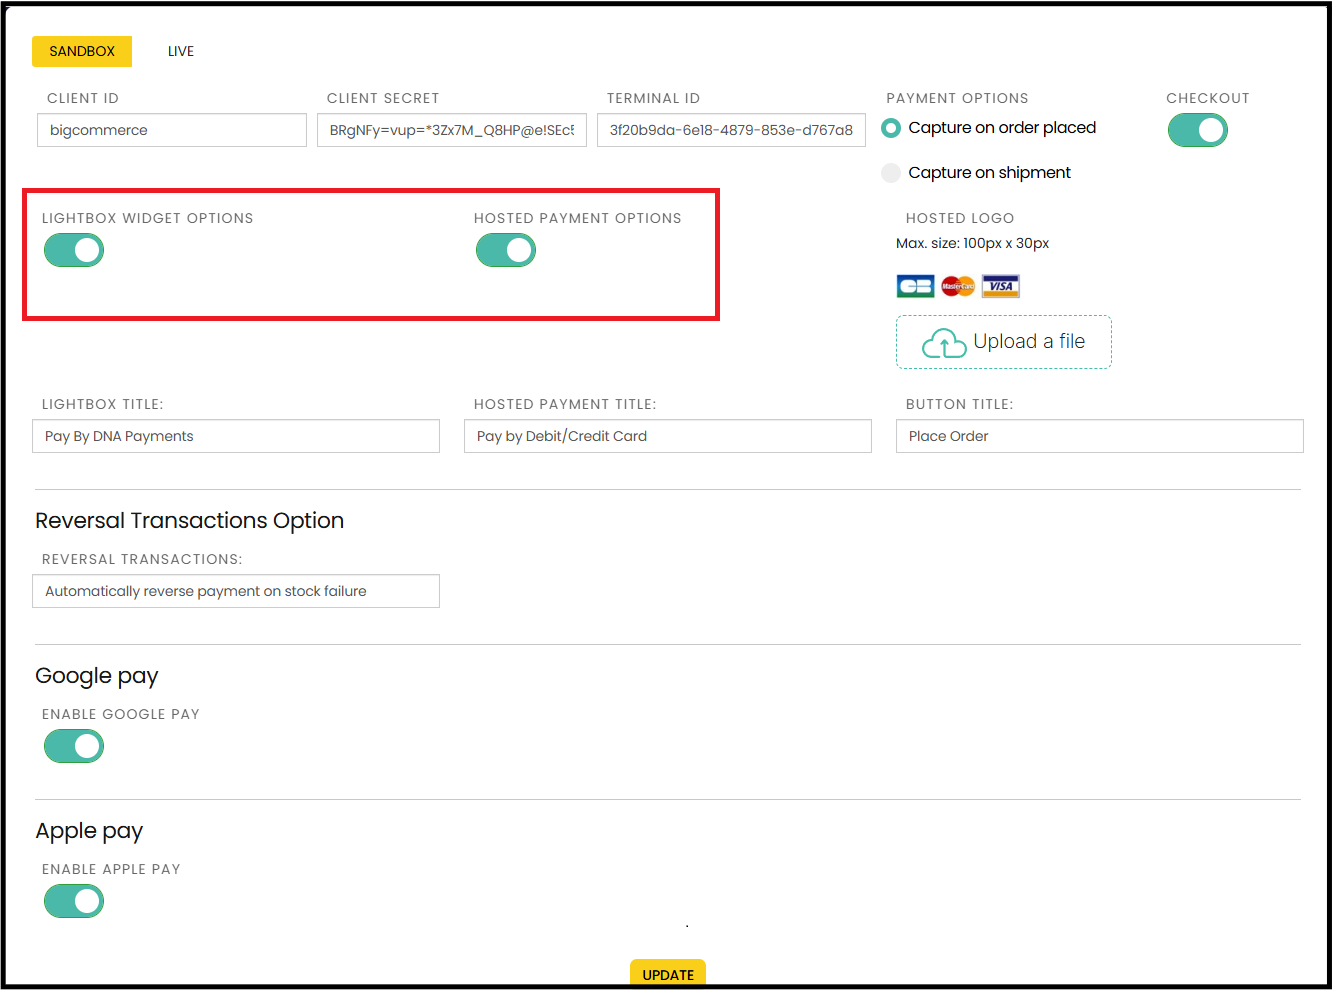
The 'Hosted Payment options' toggle allows you to enable and disable the Hosted Fields within the checkout. See above, point 7 for image. Please note we advise selecting either 'Lightbox' or 'Hosted Payment' option to avoid any confusion at checkout.
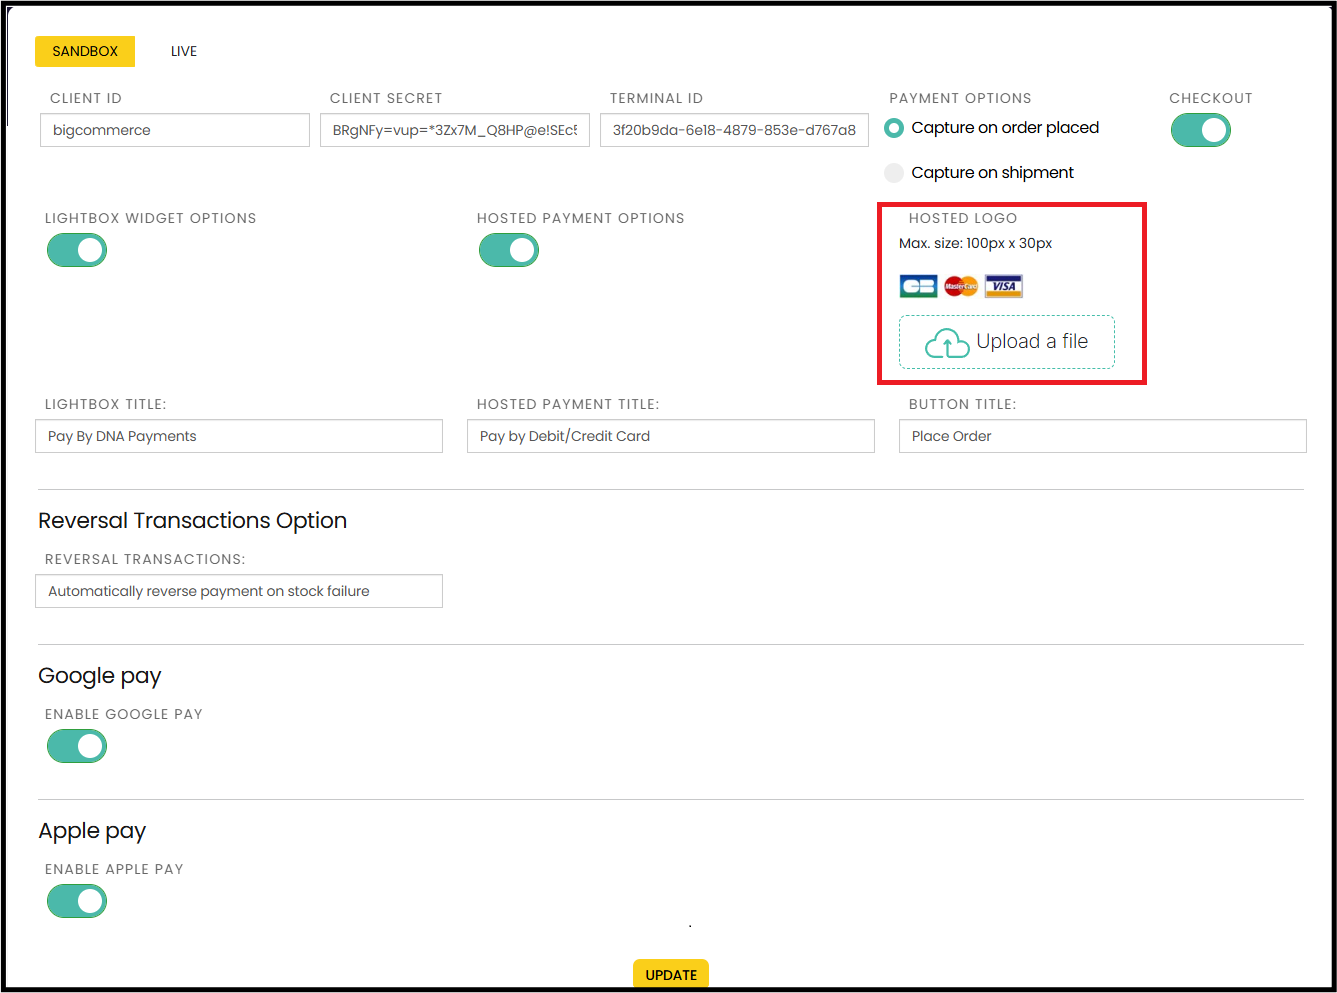
Hosted Logo can be uploaded here, in order to customise the checkout with your company logo.
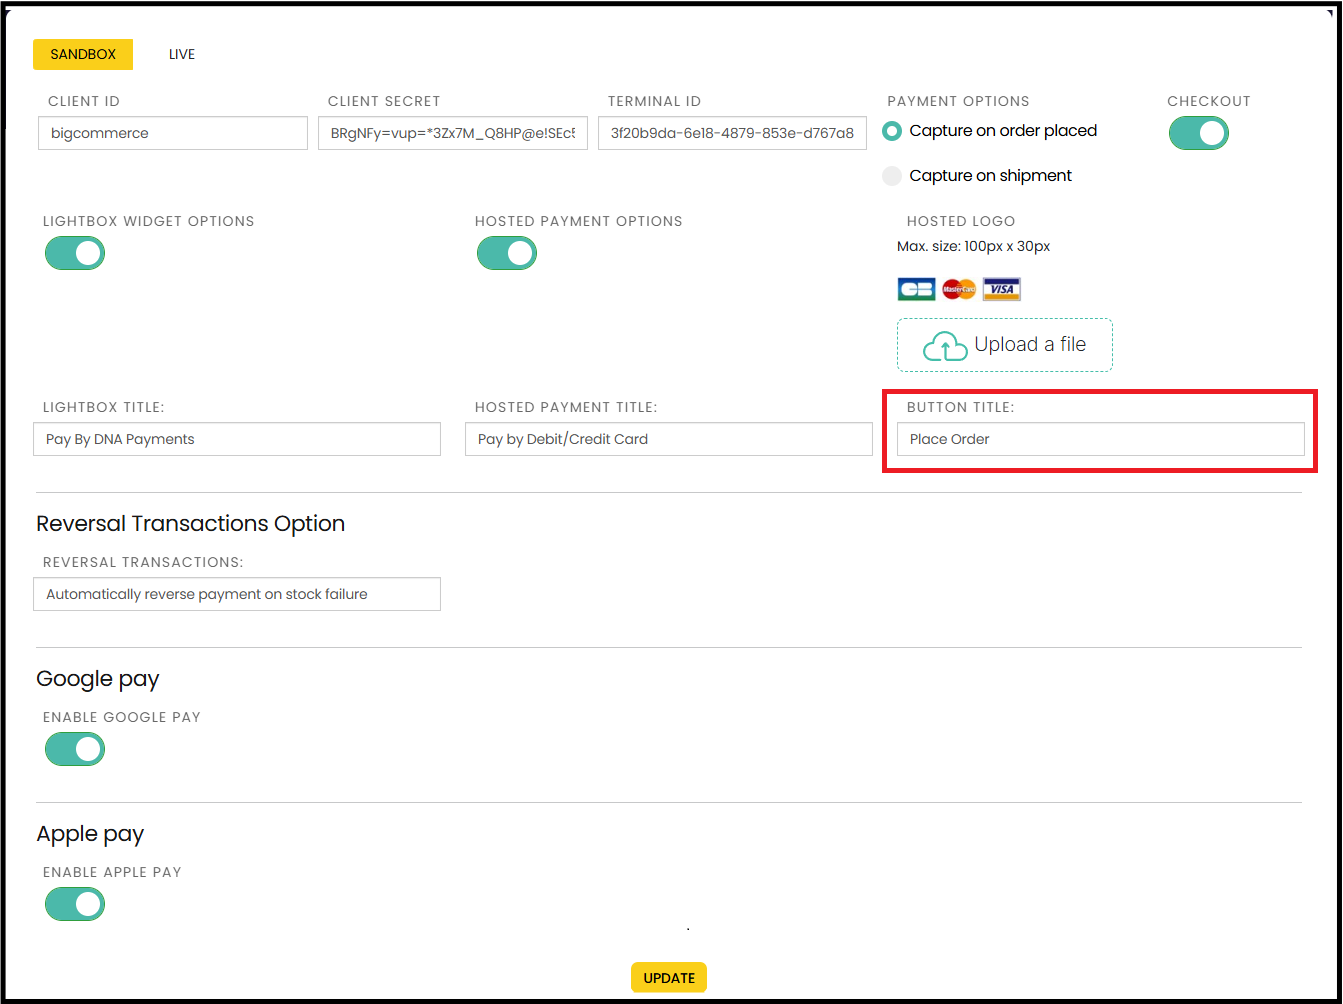
'Lightbox Title' allows you to amend the text on the Lightbox payment button, which will redirect you to the Lightbox pop up window.
'Hosted Payment Title' allows you to amend the text on the Hosted Fields payment button, which will complete your payment within the checkout without redirecting. See above, point 10 for image.
'Button Title' allows you change the text on the payment button.
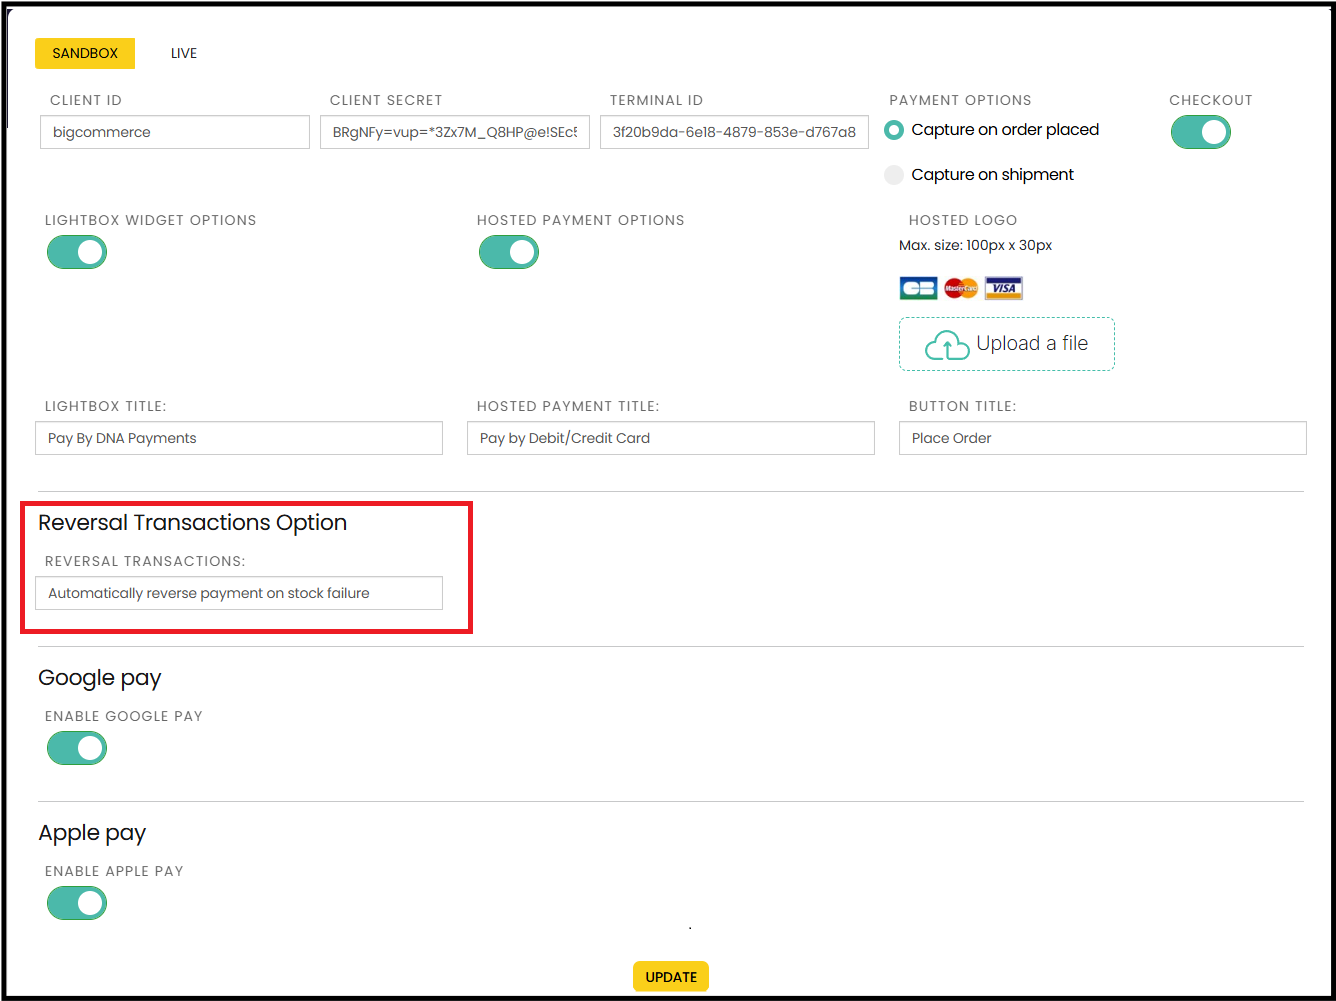
'Reversal Transactions Option' This has been put in place to assist with low stock management. You have two options, 'Automatic reverse' where there is conflict, the system will automatically refund the later transaction, while the first customer is able to complete their transaction. The other option, 'Manual reverse' will require the merchant to manually monitor for this scenario using the 'Reversal Transaction' button, see 'Reversal Transaction' button below for further information.
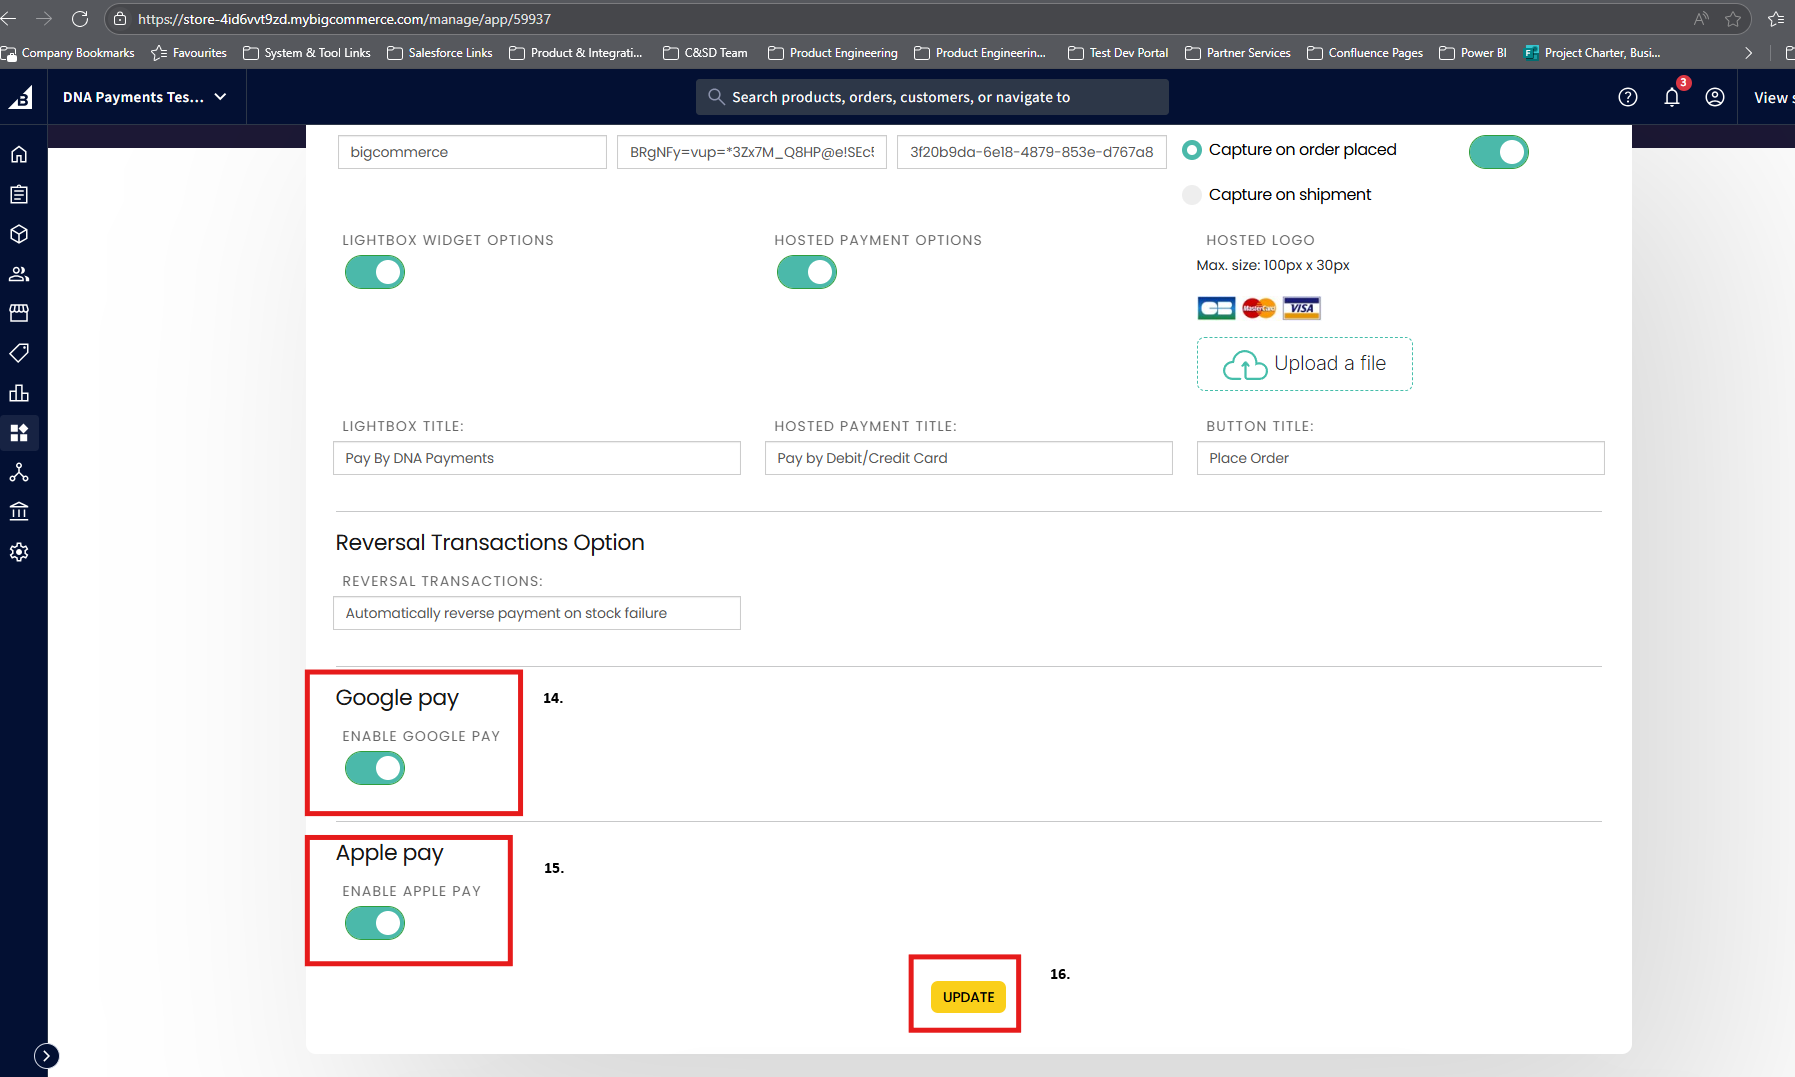
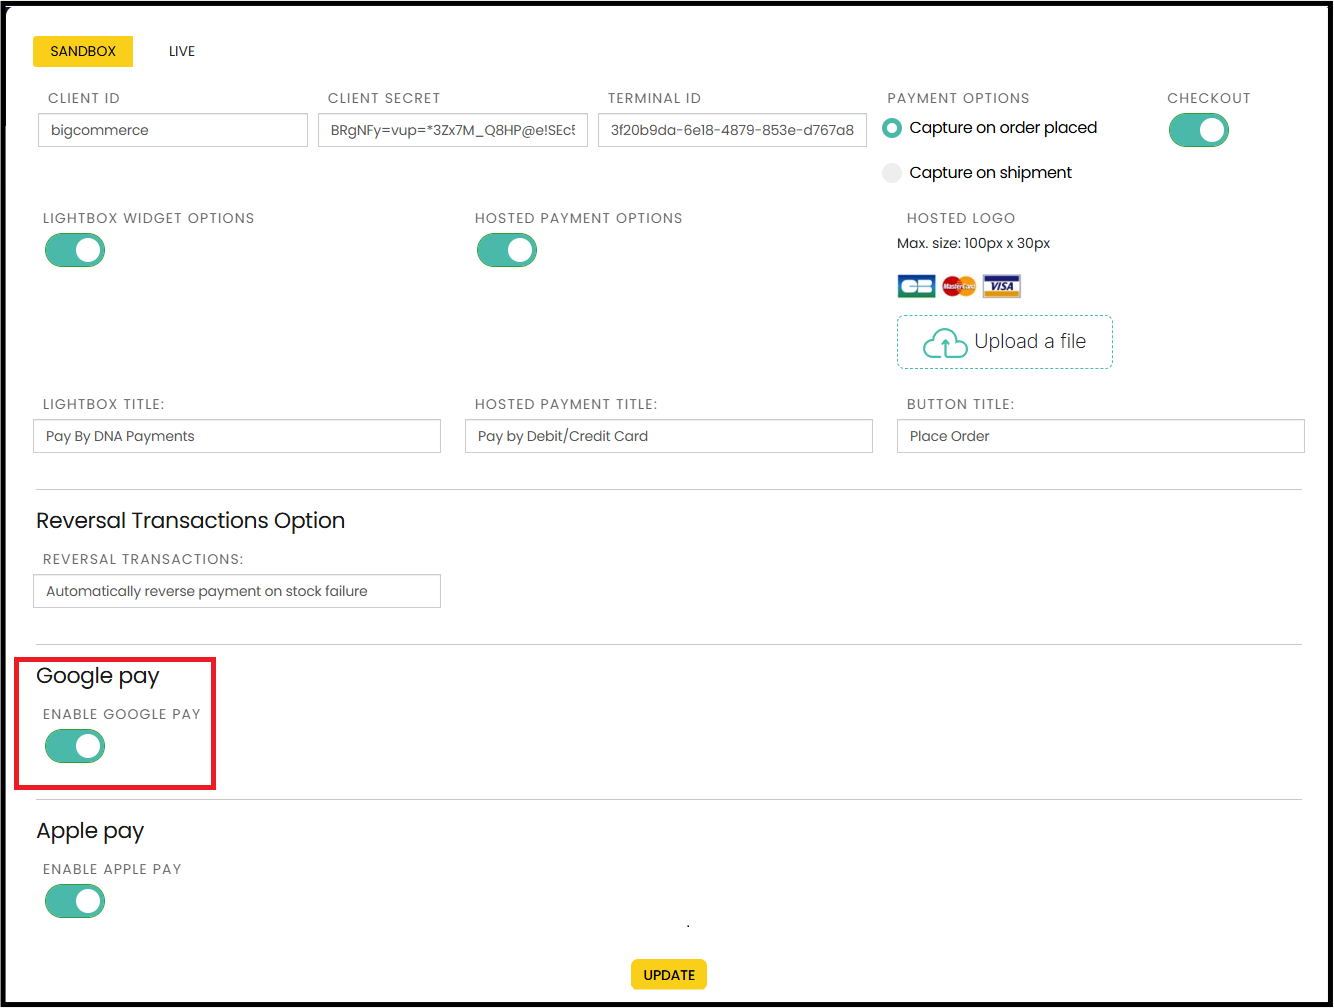
'Google pay' toggle allows you to enable/disable Googlepay on the checkout
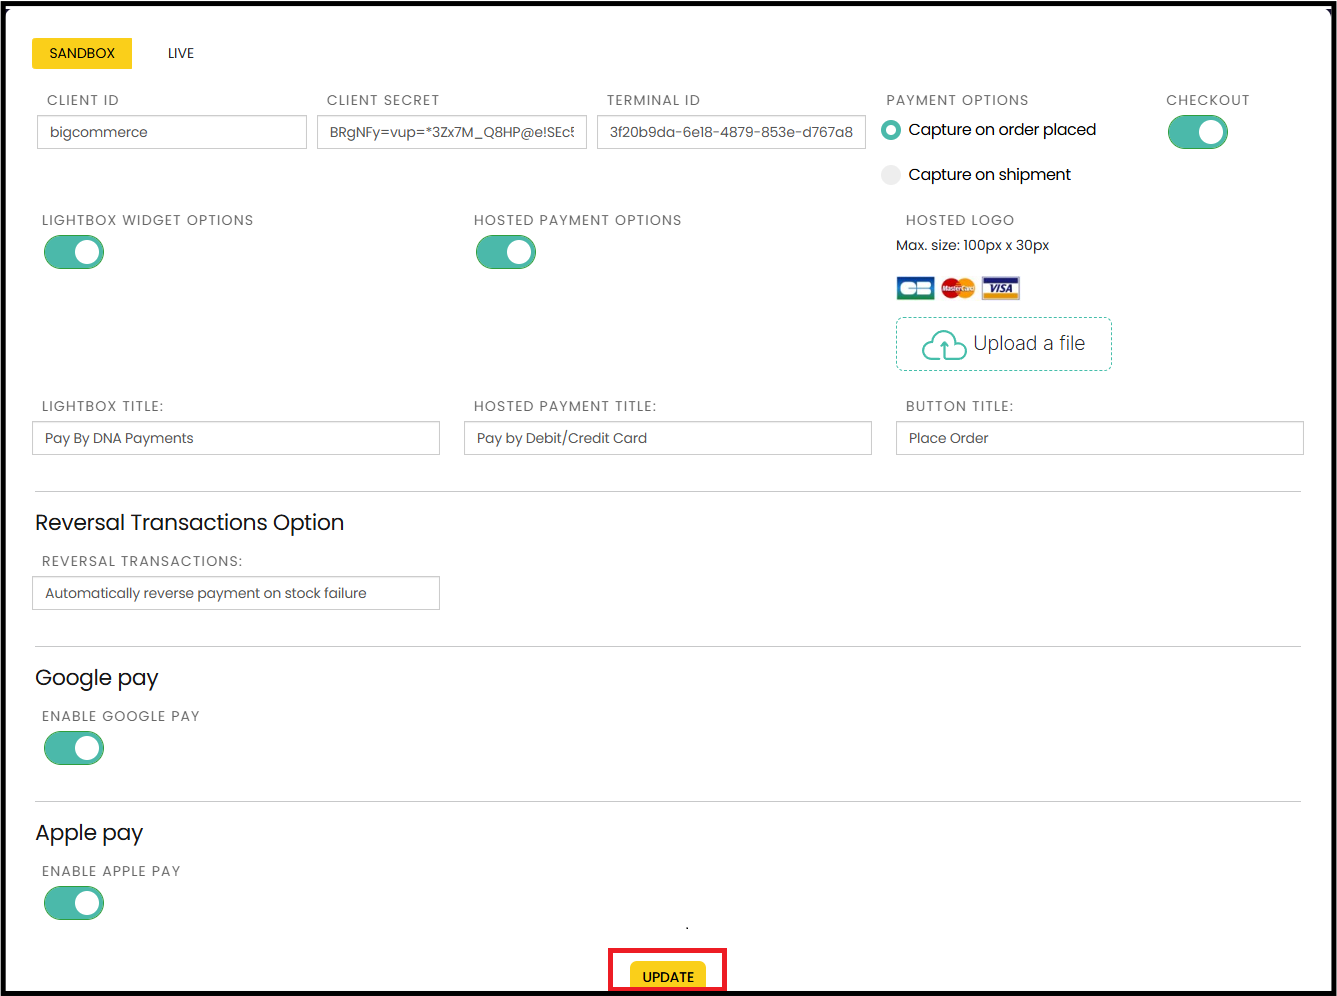
'Apple pay' toggle allows you to enable/disable Applepay on the checkout.

'Update' allows save changes.
4. Custom payment button
You can skip this section if you are satisfied with the default DNA Payments payment button in the checkout page. Otherwise, click the Custom Payment Button button in the top right corner of the Dashboard.

It will open the page where you can customize the DNA Payments payment button.
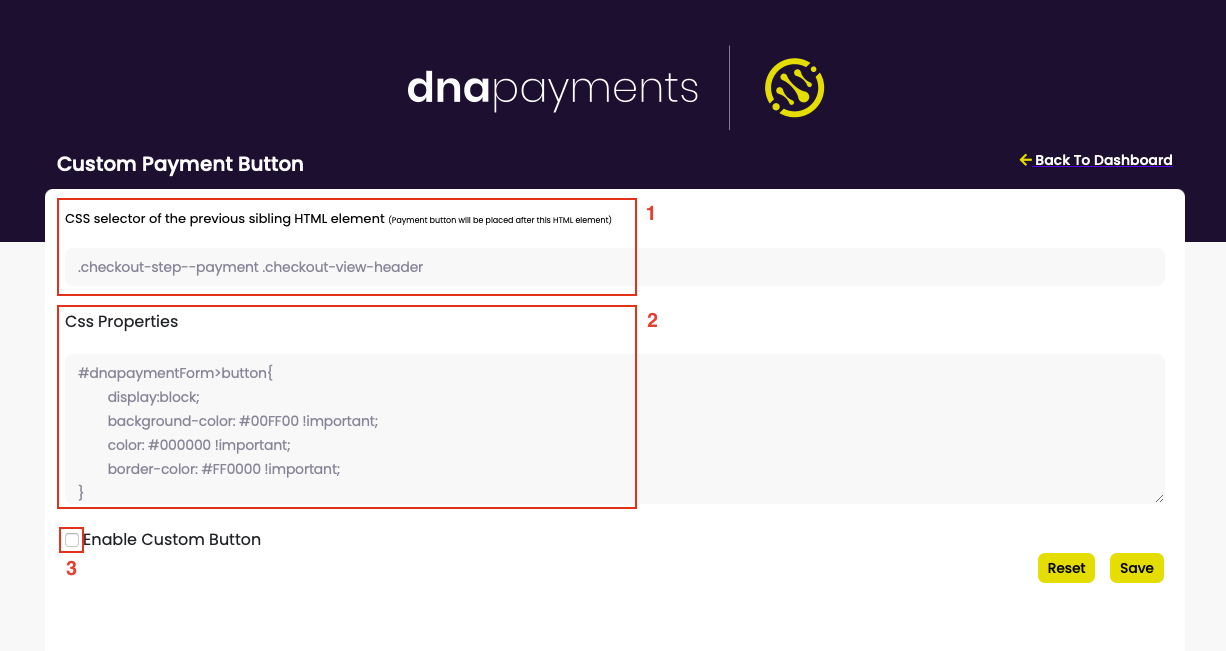
- CSS selector of the HTML element in the Checkout page where the DNA Payments payment button will be placed after. You can change the position of the DNA Payments payment button, but we do NOT recommend it.
- CSS styles which will be added to the DNA Payments payment button in the Checkout page.
- By selecting the checkbox, you can enable or disable the changes described in the above 2 items.
In order to save the changes, you must click the Save button. By clicking the Reset button, you can restore the default settings.
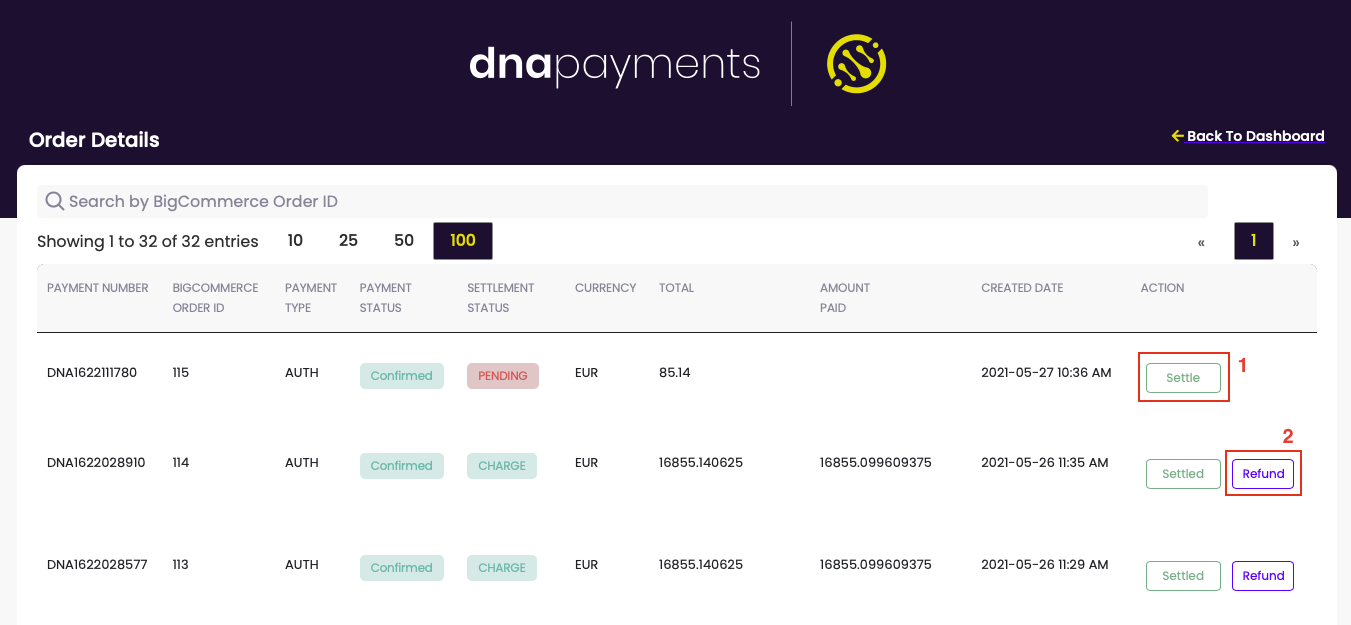
5. Order Details table
When you click the Order Details button or View all link in the top right corner of the Dashboard, it opens the Order Details page where you can see all orders, settle or refund orders.
If Capture on shipment is selected in your Payment Options, then after a successful payment there will be the Settle button next to the order to settle the payment.
Next to the settled orders there will be the Refund button to refund a payment.
6. Reversal Transaction
When you click on Reversal Transaction this will take you to the Reversal Transaction page. If you have selected 'Automatic reverse' then you will be able to view all those transactions where customers were automatically refunded due to low stock. However where 'Manual Reverse' is used you will need to,
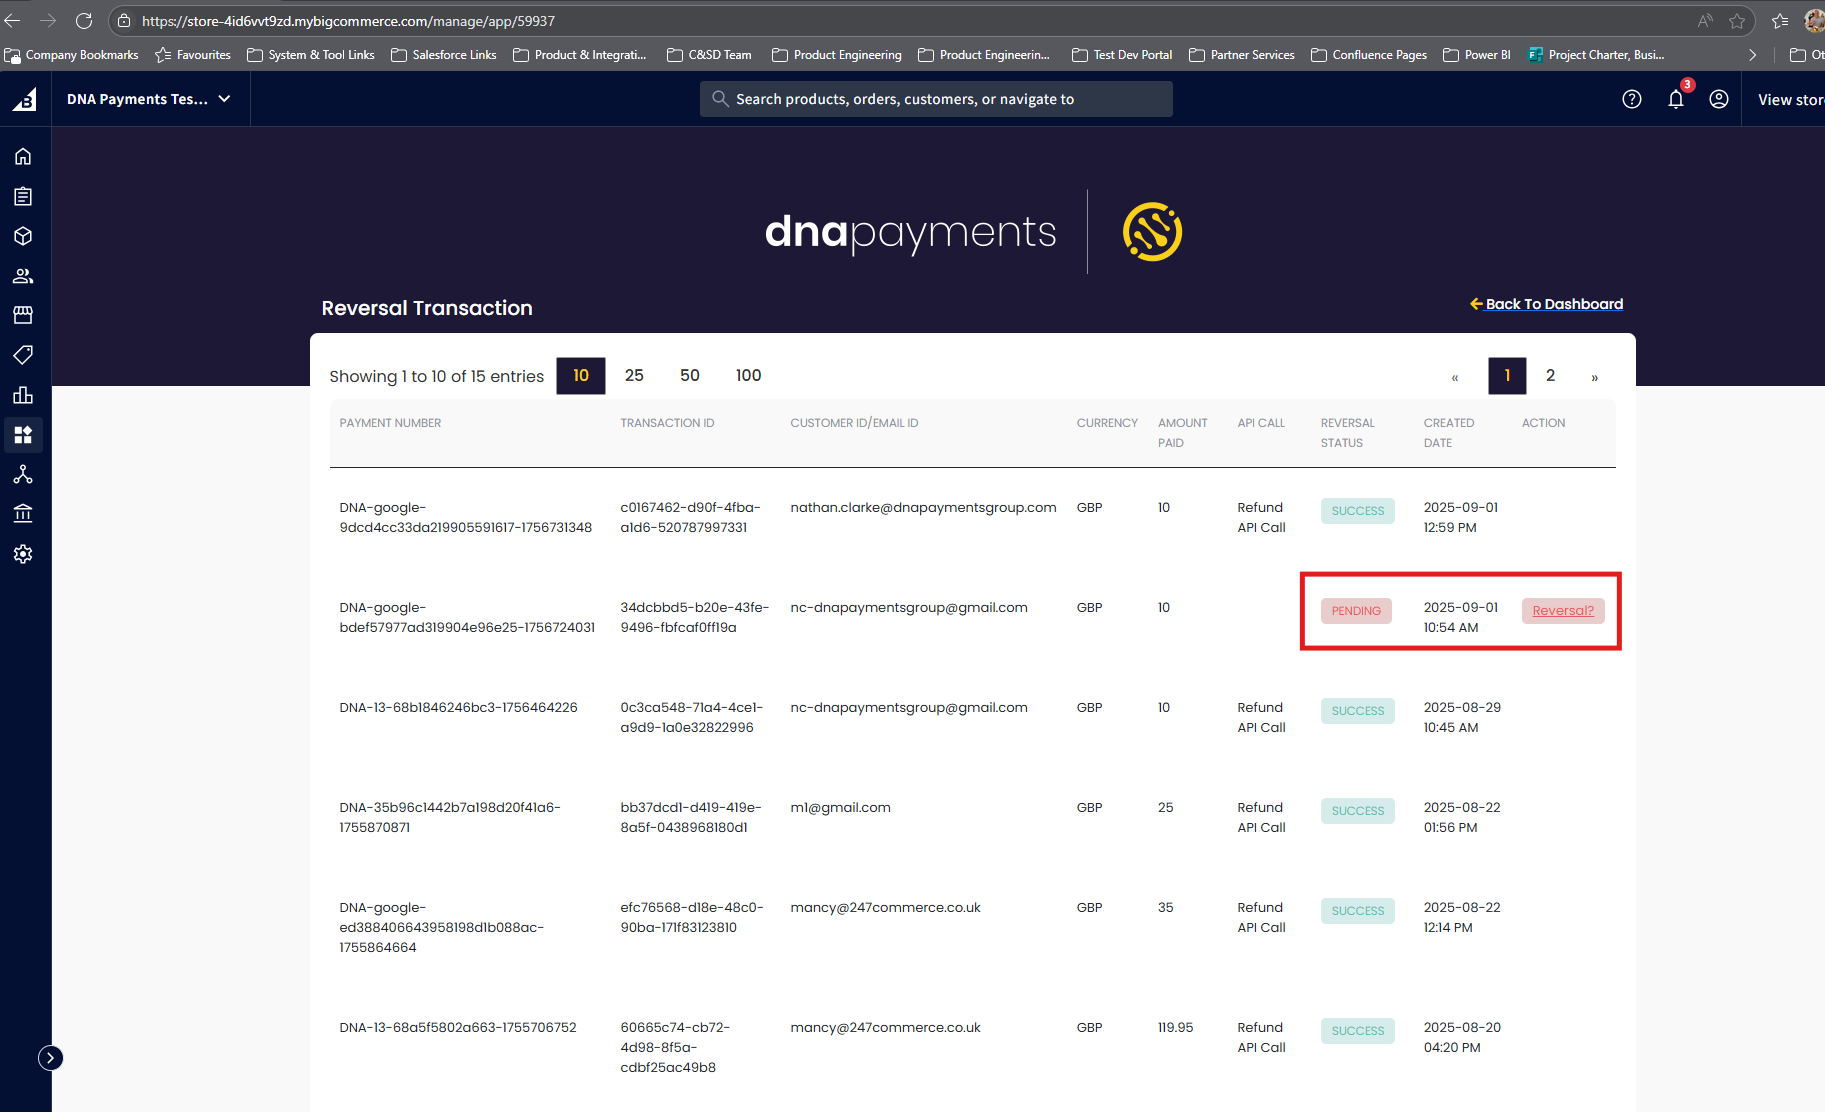
Locate the transaction(s) that will have a 'Pending' status, click on 'Reversal?'.
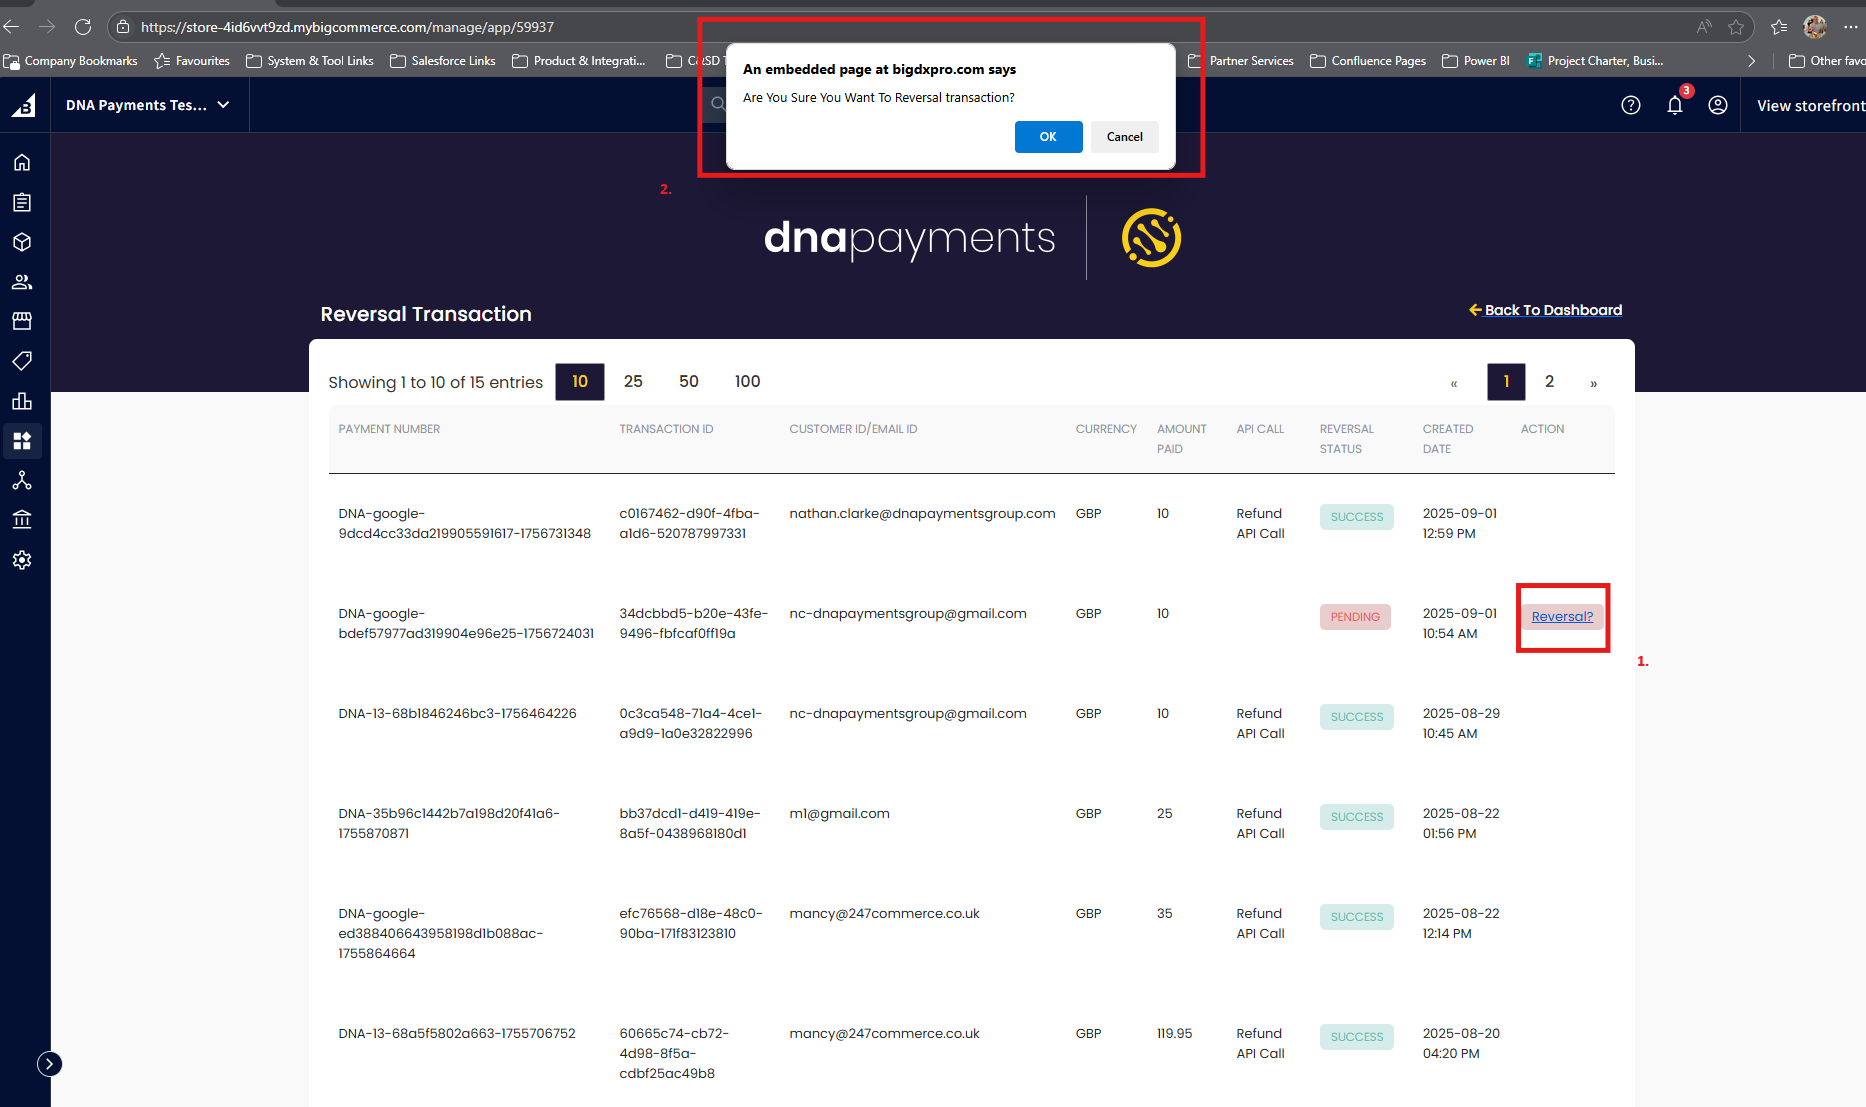
A decision pop up will appear where you can complete the Reversal Transaction.
We would advise that the 'Reversal Transaction Option' should be set to 'automatic', unless there is resource to do manual checks for reversals.7. Alternative payments
Currently, if using 'Hosted Payment Options', other than 'Pay by card' the only payment options available will be either Applepay or Googlepay. If you are interested in adding further 'Additional Payment Methods', other than Applepay and Googlepay, please contact your Sales Manager.
If using the 'Lightbox Widget' Options, then all available alternative payment methods (APMs) to DNA Payments, will be available.

8. Save Card Functionality
It is only possible for a customer to use the 'Save Card' functionality where a customer user account has been created, before completing a transaction.
In the 'Lightbox Widget' integration, see image below,

In the 'Hosted Payment Options' integration, see image below,

Locate the transaction(s) that will have a 'Pending' status, click on 'Reversal?'.
A decision pop up will appear where you can complete the Reversal Transaction.
We would advise that the 'Reversal Transaction Option' should be set to 'automatic' unless there is resource to do manual checks for reversals.